Thursday, 15 July 2021

Merge All Finder Windows into a Single Tabbed Window in Mac OS X

 Finder Tabs are one of the better Mavericks improvements brought to the Mac OS X Finder in years, letting you use the file system in a single window view, with each open folder or directory path as it’s own unique tab.

Used properly, Finder Tabs will prevent the enormous amounts of window clutter that can occur unintentionally when navigating around the Mac file system and juggling a handful of different windows and locations, but if you find yourself overwhelmed with Finder window overload you can use the excellent Merge feature to gather all windows into a single Finder window with tabs.

How to Merge All Finder Windows into Tabs on Mac

  • With multiple Finder windows open, pull down the “Window” menu and select “Merge All Windows”

Merge All Windows brings all windows into Finder Tabs in OS X

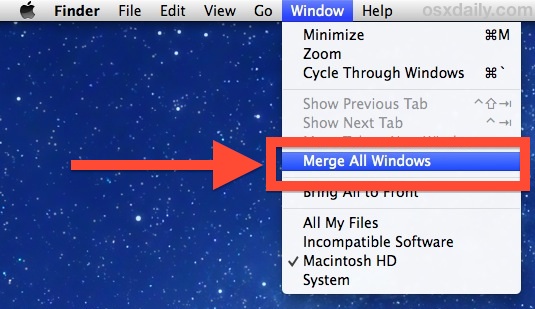
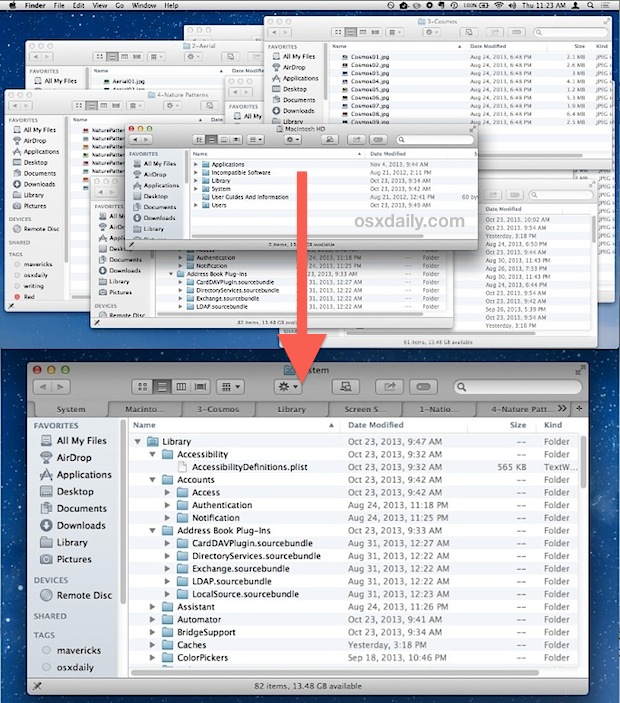
This instantly retrieves every single open Finder window, regardless of their folder path, into a single tabbed Finder window view.

Merge all Finder windows into tabs

You can always add new Finder tabs to this window (or any other) by hitting Command+T or by pressing the little [+] plus button in the tabbed window too.

The behavior is very similar to how just about every modern web browser works, allowing you to merge and gather single windows into a unified window for easier browsing and less clutter. Much like Chrome, Firefox, or Safari, you can also set a keyboard shortcut for this task if you find yourself using the Merge Windows feature in the Finder often.

Set a Keyboard Shortcut for Merging All Finder Windows Into Tabs

Use the Merge Finder Windows often? You can easily create a custom keystroke to merge all Finder windows into tabs:

  1. Open System Preferences from the  Apple menu and go to “Keyboard”
  2. Choose the “Shortcuts” tab and then select “App Shortcuts” from the left side menu
  3. Press the [+] plus button to create a new shortcut
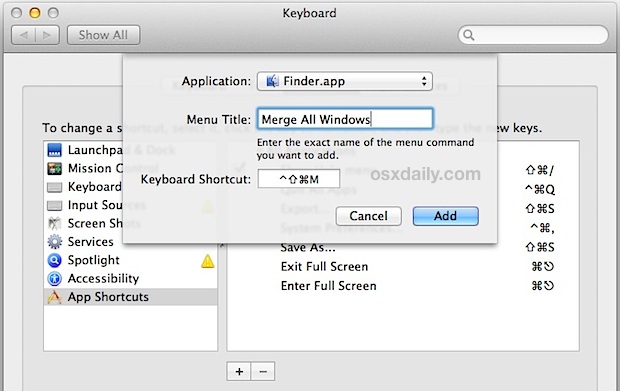
  4. From “Application” select “Finder.app”, and set ‘Menu Title’ to “Merge All Windows”
  5. Click into the “Keyboard Shortcut” box and hit your preferred keystroke (Command+Control+Shift+M is the sample given, but use whatever you want)
  6. Exit System Preferences, and visit the Finder with multiple windows open to try out your new merge window keyboard shortcut

keyboard shortcut for merging Finder windows into tabs

Finder Tabs are easy to use and are just one of several very simple excellent features added to the Mac with OS X Mavericks, available in all modern versions beyond as well. Get in the habit of using them in the Finder, you’ll be glad you did.


from: https://osxdaily.com/2013/11/07/merge-windows-into-tabs-finder-mac-os-x/

Tuesday, 2 June 2020

How To Upgrade Your Bash Version On MacOS?

GNU Bash is a powerful shell, unfortunately most operating systems distribution don't provide you with the latest version which may prevent you to take advantage of the great new features that came with Bash 4 and 5. Also, running an outdated bash version probably expose you to some major vulnerabilities. For example, MacOS comes with Bash 3.x which is quite limiting and lack key features like associative arrays (dictionaries), improved auto-completion, better Posix conformance, etc. This post cover simple steps to upgrade bash on MacOS.

👉 Update: Find out more about Bash version 5 with my post What's New in GNU Bash 5?.

Check Your Current Bash Version

First and foremost, you need to know which version you are currently running as a defualt shell using the below commands.

[me@me-macOS: ~]$ bash --version
GNU bash, version 3.2.57(1)-release (x86_64-apple-darwin18)
Copyright (C) 2007 Free Software Foundation, Inc.

[me@me-macOS: ~]$ echo ${BASH_VERSION}
3.2.57(1)-release

Upgrade with Homebrew

If you are not yet using Homebrew, start doing so. It is a great package management for MacOS which will simplify a lot of the steps for you. Simply install it with this command:

[me@me-macOS: ~]$ /usr/bin/ruby -e "$(curl -fsSL https://raw.githubusercontent.com/Homebrew/install/master/install)"

Then, upgrade, install, and reload bash.

[me@me-macOS: ~]$ brew upgrade
Updating Homebrew...

[me@me-macOS: ~]$ brew install bash
Updating Homebrew...
==> Auto-updated Homebrew!
Updated 1 tap (homebrew/cask).
No changes to formulae.

==> Downloading https://homebrew.bintray.com/bottles/bash-5.0.11.mojave.bottle.tar.gz
==> Downloading from https://akamai.bintray.com/01/0...
######################################################################## 100.0%
==> Pouring bash-5.0.11.mojave.bottle.tar.gz
🍺  /usr/local/Cellar/bash/5.0.11: 150 files, 9.4MB

Reload and Verify

To reload bash, we can simply use exec as we saw in a previous post. Then, check your version again.

[me@me-macOS: ~]$ exec bash
[me@me-macOS: ~]$ bash --version
GNU bash, version 5.0.11(1)-release (x86_64-apple-darwin18.6.0)
Copyright (C) 2019 Free Software Foundation, Inc.
License GPLv3+: GNU GPL version 3 or later <http://gnu.org/licenses/gpl.html>

⚠️ Be careful: Your old bash 3 version would still be installed in /bin/bash while the brew version would be in /usr/local/bin/bash. You can check which version you are using with echo $SHELL or which bash.

Change Your Default Bash

👉 Note that the newest versions of macOS (Starting at Catalina) now uses zsh as a default instead of bash. Though, bash version 3 is still installed and available. To find out which macOS version youa re running, check out my post How to Find which Mac OS version you are running?.

To go a step further, you will want to make your new shell with Bash version 5 to be your user's default shell. First, you will need to update the list of permitted shells by adding the bash brew version into /private/etc/shells.

[me@me-macOS: ~]$ echo $(brew --prefix)/bin/bash | sudo tee -a /private/etc/shells
/usr/local/bin/bash

[me@me-macOS: ~]$ cat /private/etc/shells
# List of acceptable shells for chpass(1).
# Ftpd will not allow users to connect who are not using
# one of these shells.

/bin/bash
/bin/csh
/bin/ksh
/bin/sh
/bin/tcsh
/bin/zsh
/usr/local/bin/bash

Finally, you will eed to update your user's shell with chpass.

[me@me-macOS: ~]$ sudo chpass -s /usr/local/bin/bash johndoe
Changing shell for johndoe.

Alternatively, instead of using chpass, you can go to the  Menu > System Preferences... > Users & Groups. Unlock the pane, control click on your user to select Advanced Options..., then update the Login shell to /usr/local/bin/bash.


Merge All Finder Windows into a Single Tabbed Window in Mac OS X

  Finder Tabs are one of the better Mavericks improvements brought to the Mac OS X Finder in years, letting you use the file system in a sin...